
I have paper scraps. I'm talking heaps and heaps of paper scraps in every size, shape, pattern, and color you could imagine. My paper scrap collection is growing by the second and I'm pretty sure that if I leave it unattended much longer its going to come to life and eat me while I sleep.
So what better to do with all of that fabulous paper than make pretty paper flowers! I mean really, you can't go wrong with paper flowers.
So here is my first ever bloggy tutorial - that pretty much just "blossomed" out of me being bored and trying to figure out something to do with my mounds of paper. Oh and the camera just happened to be sitting next to me throughout :)
Materials needed:
Paper (obviously!)
Stapler
Double sided sticky tape
Paper (obviously!)
Stapler
Double sided sticky tape
I used 15 strips of paper measuring 12 inches long x 1 inch wide. But you can use shorter or longer pieces of paper depending on your desired size of flower. And you don't have to use 15 strips, more or less works too, depending on if you want your loops squished down or not. Its not an exact science, but you'll be able to tell what works for you and what doesn't.
Start out by stapling the ends of your paper together to form tear drop shapes
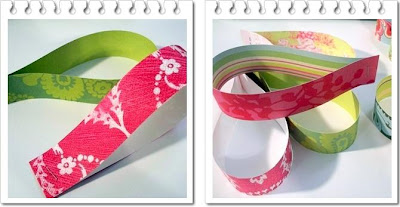
Next line up the bottoms of the tear drops as a guide one at a time and affix a small piece of double sided tape to the upper loops. Do NOT tape the stapled ends together.
When you have all of your teardrop loops taped together you should have a garland that looks similar to this.

Next grab a pretty piece of ribbon and loop it and tape to the inside of the last loop. (regular tape works fine for this)

When you're done, using double sided tape again, tape the last 2 loops together as shown to form the basic shape of your flower. Now this flower as is will not hang without the middle popping out, so when laying down it should make a natural line in the middle forming 2 separate parts of the flower. Using a long piece of double sided tape, tape the two sides together to secure the flower into its round shape.

You should have something looking similar to this at this stage:

Next cut out two circles of another pretty designed paper - I used a 2 inch punch, but the size of the circle can be left up to you, just make sure that it covers the joints of the flower petals. Using 2 pieces of double sided tape, make a cross on each circle and then affix in the middle of your flower, one on each side.

Now hang up your pretty flower and enjoy! - Mine is currently dangling from the ceiling above my craft table.
 **I used scrap paper for this flower, but if you used papers in coordinating colors and designs, particularly paper with double sided designs, this would look a lot better! These paper flowers make really sweet party and shower decorations too!!**
Now hang up your pretty flower and enjoy! - Mine is currently dangling from the ceiling above my craft table.
**I used scrap paper for this flower, but if you used papers in coordinating colors and designs, particularly paper with double sided designs, this would look a lot better! These paper flowers make really sweet party and shower decorations too!!**
6 comments:
That's really cute. Great tutorial.
SO CUTE!!!!
Very cute!! Thanks for sharing.
So very sweet...and your tutorial and pix were very well done!
xxx
ooh, ooh, an Oh Mandie tutorial!!!
Totally cute tutorial! If you ever wanna do a paper scrap pack swap, let me know :D
Post a Comment